Unit 4 Exercise 10
Exercise 10: File Movement
Objective
To utilize the Windows Sub-Types to Copy, Rename, Move and Delete a file.
Summary
You will create two directories and one file in a File Explorer window and then manipulate the movement of that file utilizing the Copy, Rename, Move and Delete sub-types.
Then you will manually release each of the jobs and monitor the movement of the file.
Instructions
Create Directories and the File
- In a Windows Explorer create two directories,
C:\FinishandC:\Start. - Open Notepad and create a new file.
- Type something in the file and save it as
File-to-be-copied.txtin the C:\Start directory. - Close Notepad.
Create the Schedule
- In Library > Administration, select Master Schedules.
- Click the Add button.
- On the Master Schedule Definition screen:
- In the Name field, enter
Windows Sub-Types Exercise. - In the Documentation field, enter in some documentation.
- Example: This is a training Schedule for Windows Sub-Type Jobs.
- Saturday and Sunday are non-working days.
- Do NOT configure Auto Build.
- Click the Save.
- Click Back.
Add the Copy Job to the Schedule
- Utilizing the filters in the Schedule List, locate and select Windows Sub-Types Exercise.
- Select Add Job in the side menu.
- On Master Job Definition screen:
- In the Name field, enter
File Copy. - In the Job Type dropdown, select Windows.
- In the Machine Selection dropdown, select the SMATraining machine for the Job to run on.
- In the Job Sub-Type section, click the blue Edit button.
- In the Job Sub-Type Details pop-up window:
- Select Command: File Copy.
- In the Source field, type
C:\Start\File-to-be-copied.txt - In the Destination field, type
C:\Start\File-to-be-renamed.txt - Click the Save button.
- In the User ID dropdown, select SMATRAINING\SMAUSER
- Click the Save.
- Click the Lock button in the upper right-hand corner.
- Add some Documentation to the Job.
- In the Frequency section, move Mon-Sun-O from the Inactive column and to the Active column.
- Select the Frequency in the Active column and in Job Build Status dropdown, select On Hold.
- Click the Save button.
- Click Back.
Add the Rename Job to the Schedule
- Select Add Job in the side menu.
- On Master Job Definition screen:
- In the Name field, enter
File Rename. - In the Job Type dropdown, select Windows.
- In the Machine Selection dropdown, select the SMATraining machine for the Job to run on.
- In the Job Sub-Type section, click the blue Edit button.
- In the Job Sub-Type Details pop-up window:
- Select Command: File Rename.
- In the Path and Current File Name field, type
C:\Start\File-to-be-renamed.txt - In the New File Name field, type
File-to-be-moved.txt - Click the Save button.
- In the User ID dropdown, select SMATRAINING\SMAUSER
- Click the Save.
- Click the Lock button in the upper right-hand corner.
- Add some Documentation to the Job.
- In the Frequency section, move Mon-Sun-O from the Inactive column and to the Active column.
- Select the Frequency in the Active column and in Job Build Status dropdown, select On Hold.
- Click the Save button.
- Click Back.
note
You may have noticed that you only need to specify the new file name and not the entire path when using this sub-type.
Add the Move Job to the Schedule
- Select Add Job in the side menu.
- On Master Job Definition screen:
- In the Name field, enter
File Move. - In the Job Type dropdown, select Windows.
- In the Machine Selection dropdown, select the SMATraining machine for the Job to run on.
- In the Job Sub-Type section, click the blue Edit button.
- In the Job Sub-Type Details pop-up window:
- Select Command: File Move.
- In the Source field, type
C:\Start\File-to-be-moved.txt - In the Destination field, type
C:\Finish\File-to-be-deleted.txt - Click the Save button.
- In the User ID dropdown, select SMATRAINING\SMAUSER
- Click the Save
- Click the Lock button in the upper right-hand corner.
- Add some Documentation to the Job.
- In the Frequency section, move Mon-Sun-O from the Inactive column and to the Active column.
- Select the Frequency in the Active column and in Job Build Status dropdown, select On Hold.
- Click the Save button.
- Click Back.
Add the Delete Job to the Schedule
- Select Add Job in the side menu.
- On Master Job Definition screen:
- In the Name field, enter
File Delete. - In the Job Type dropdown, select Windows.
- In the Machine Selection dropdown, select the SMATraining machine for the Job to run on.
- In the Job Sub-Type section, click the blue Edit button.
- In the Job Sub-Type Details pop-up window:
- Select Command: File Delete.
- In the Source field, type
C:\Finish\File-to-be-deleted.txt - Click the Save button.
- In the User ID dropdown, select SMATRAINING\SMAUSER
- Click the Save
- Click the Lock button in the upper right-hand corner.
- Add some Documentation to the Job.
- In the Frequency section, move Mon-Sun-O from the Inactive column and to the Active column.
- Select the Frequency in the Active column and in Job Build Status dropdown, select On Hold.
- Click the Save button.
- Click Back.
Testing the Configuration
- In Operations, build Windows Sub-Types Exercise in a Released state for today only.
- In Processes, check that all Jobs are On Hold.
- Open the folder
C:\Startusing Windows Explorer and check that the fileFile-to-be-copied.txtis there. - In Processes, release the File Copy Job.
- Go back to Windows Explorer and check that the
File-to-be-renamedwas created. - In Processes, release the Job File Rename.
- Go back to Windows Explorer and check that the
File-to-be-renamedis renamed toFile-to-be-moved - In Processes, release the Job File Move.
- Go back to Windows Explorer and check that the
File-to-be-movedwas moved to theC:\Finishfolder and has theFile-to-be-deletedname. - In Processes, release the Job File Delete.
- Go back to Windows Explorer and check that the
File-to-be-deletedwas deleted.
Enterprise Manager
Details
Create a New File and a New Schedule
- Go to Windows Explorer and create the
C:\FinishandC:\Startfolders. - If not running, open Notepad and create a new file.
- Type something and save the file as
C:\Start\File-to-be-copied.txt. - Close Notepad.
- Under the Administration topic, Double-Click on Schedule Master.
- Click the Add button on the Schedule Master toolbar.
- In the Name field, enter Windows Sub-Types Exercise.
- In the Documentation field, enter This is a training Schedule for Windows Sub-Type Jobs.
- Keep Monday through Friday selected for the Workdays per Week for the Schedule to run.
- In the Schedule Properties > Build frame, keep the Auto Build unchecked.
- Click the Save button on the Schedule Master toolbar.
- Close the Schedule Master tab.
Add Jobs to the New Schedule
- Under the Administration topic, Double-Click on Job Master.
- In the Schedule drop-down list, select Windows Sub-Types Exercise.
- Click the Add button on the Job Master toolbar.
- In the Name field, enter File Copy.
- In the Job Type drop-down list, select
Windows. - In the Job Sub-Type drop-down list select
Command: File Copy. - In the Primary Machine drop-down list, select the
SMATrainingmachine for the Job to run on. - In the User ID drop-down list, select
SMATRAINING\SMAUSER - In the Source field, type
C:\Start\File-to-be-copied.txt - In the Destination field, type
C:\Start\File-to-be-renamed.txt - Click the Save button on the Job Master toolbar.
- Click the Frequency tab.
- Within the Frequency list frame, click the Add button.
- On the Frequency Definition Wizard, keep Use existing Frequency selected and select
Mon-Sun-Ofrom the Frequency drop-down list. Then click Next. - Click Finish.
- Under the Job Build Status frame, click the On Hold radio button.
- Click the Save button on the Job Master toolbar.
- Click the Documentation tab and add some documentation.
- Do not close the Job Master tab. Go to the next step.
- Click the Add button on the Job Master toolbar.
- In the Name field, enter File Rename.
- In the Job Type drop-down list, select
Windows. - In the Job Sub-Type drop-down list select
Command: File Rename. - In the Primary Machine drop-down list, select the
SMATrainingmachine for the Job to run on. - In the User ID drop-down list, select
SMATRAINING\SMAUSER - In the Path and Current File Name field, type
C:\Start\File-to-be-renamed.txt - In the New File Name field, type
File-to-be-moved.txt
- Note: You are renaming the file! So you do not specify the whole path!
- Click the Save button on the Job Master toolbar.
- Click the Frequency tab.
- Within the Frequency list frame, click the Add button.
- In the Frequency Definition Wizard, keep Use existing Frequency selected and select
Mon-Sun-Ofrom the Frequency drop-down list. Then click Next. - Click Finish.
- Under the Job Build Status frame, click the On Hold radio button.
- Click the Save button on the Job Master toolbar.
- Click the Documentation tab and add some documentation.
- Click the Add button on the Job Master toolbar.
- In the Name field, enter File Move.
- In the Job Type drop-down list, select
Windows. - In the Job Sub-Type drop-down list select
Command: File Move. - In the Primary Machine drop-down list, select the
SMATrainingmachine for the Job to run on. - In the User ID drop-down list, select
SMATRAINING\SMAUSER - In the Source field, type
C:\Start\File-to-be-moved.txt - In the Destination field, type
C:\Finish\File-to-be-deleted.txt - Click the Save button on the Job Master toolbar.
- Click the Frequency tab.
- Within the Frequency list frame, click the Add button.
- On the Frequency Definition Wizard, keep Use existing Frequency selected and select
Mon-Sun-Ofrom the Frequency drop-down list. Then click Next. - Click Finish.
- Under the Job Build Status frame, click the On Hold radio button.
- Click the Save button on the Job Master toolbar.
- Click the Documentation tab and add some documentation.
- Click the Add button on the Job Master toolbar.
- In the Name field, enter File Delete.
- In the Job Type drop-down list, select
Windows. - In the Job Sub-Type drop-down list select
Command: File Delete. - In the Primary Machine drop-down list, select the
SMATrainingmachine for the Job to run on. - In the User ID drop-down list, select
SMATRAINING\SMAUSER - In the File To Delete field, type
C:\Finish\File-to-be-deleted.txt - Click the Save button on the Job Master toolbar.
- Click the Frequency tab.
- Within the Frequency list frame, click the Add button.
- On the Frequency Definition Wizard, keep Use existing Frequency selected and select
Mon-Sun-Ofrom the Frequency drop-down list. Then click Next. - Click Finish.
- Under the Job Build Status frame, click the On Hold radio button.
- Click the Save button on the Job Master toolbar.
- Click the Documentation tab and add some documentation.
- Close the Job Master tab.
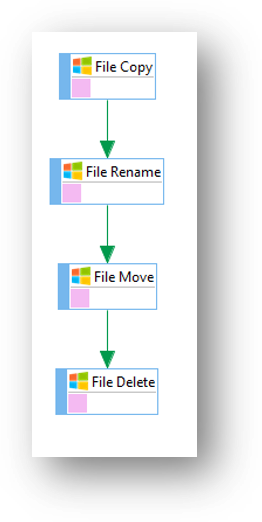
- Use Workflow Designer to create your Job Dependencies.
- Your Schedule should look like this:
Testing the Configuration
- Manually build the Windows Sub-Types Exercise in a released state.
- Check that all Jobs are On Hold.
- Open the folder
C:\Startusing Windows Explorer and check that the fileFile-to-be-copied.txtis there. - Go back to Enterprise Manager and Release the File Copy Job.
- Go back to Windows Explorer and check that the
File-to-be-renamedwas created. - Go back to Enterprise Manager and Release the Job File Rename.
- Go back to Windows Explorer and check that the
File-to-be-renamedis renamed toFile-to-be-moved - Go back to Enterprise Manager and Release the Job File Move.
- Go back to Windows Explorer and check that the
File-to-be-movedwas moved to theC:\Finishfolder and has theFile-to-be-deletedname. - Go back to Enterprise Manager and Release the Job File Delete.
- Go back to Windows Explorer and check that the
File-to-be-deletedwas deleted.